
cavity free mouth and, all the great tools available to help you do so. 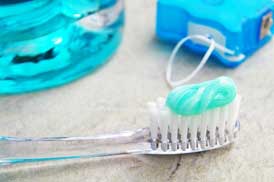 Next comes the last part, maintenance of your repertoire of home care tools. So if you’ve ever wondered ‘How to keep my toothbrush clean?’ then read on..
Posts
 Ever look on the back of the toothpaste box and wonder, what exactly is xanthan gum and why the heck is it in my toothpaste? Well wonder no more, as we go through how to decode the toothpaste label…
On every drug facts label you find a listing of active ingredients and inactive ingredients, as well as what its used for, any warnings for the product and directions for uses.
Active Ingredients: This is the part of the toothpaste that makes its use effective. In the case of most toothpastes the active ingredient is usually for anti-plaque, anti-cavity, anti-gingivitis as well as including ingredients to help prevent tooth sensitivity. So in this portion you will normally see your fluorides such as sodium fluoride, stannous fluoride or sodium monofluorophosphate. You may also see potassium nitrate, triclosan, pyrophosphates or zinc salts as well as a myriad of other ingredients.
Inactive Ingredients: This portion includes the ingredients that make the toothpaste standup to being on the shelf as well as completing the nuts and bolts function of general toothpaste use. So these ingredients stop the paste from drying out, keep it at a good pH, stop microbial growth, make them thick enough for use and help them become foamy when used. They also include flavoring agents, abrasives and whitening agents. So in this section, which in my opinion is the most confusing you’ll see these types of ingredients:
Ever look on the back of the toothpaste box and wonder, what exactly is xanthan gum and why the heck is it in my toothpaste? Well wonder no more, as we go through how to decode the toothpaste label…
On every drug facts label you find a listing of active ingredients and inactive ingredients, as well as what its used for, any warnings for the product and directions for uses.
Active Ingredients: This is the part of the toothpaste that makes its use effective. In the case of most toothpastes the active ingredient is usually for anti-plaque, anti-cavity, anti-gingivitis as well as including ingredients to help prevent tooth sensitivity. So in this portion you will normally see your fluorides such as sodium fluoride, stannous fluoride or sodium monofluorophosphate. You may also see potassium nitrate, triclosan, pyrophosphates or zinc salts as well as a myriad of other ingredients.
Inactive Ingredients: This portion includes the ingredients that make the toothpaste standup to being on the shelf as well as completing the nuts and bolts function of general toothpaste use. So these ingredients stop the paste from drying out, keep it at a good pH, stop microbial growth, make them thick enough for use and help them become foamy when used. They also include flavoring agents, abrasives and whitening agents. So in this section, which in my opinion is the most confusing you’ll see these types of ingredients:
- Propylene glycol, glycerol, and polyethylene glycol to help keep toothpaste moist
- Carageenan, cellulose and xanthan gum to thicken and hold all the ingredients together
- Sodium benzoate and methyl paraben to keep toothpaste from decaying and to prevent microbial growth
- Sodium lauryl sulphate and cocoadmidopropyl betaine to make toothpaste foam thereby helping loosening and removing plaque from the tooth surface.
- sodium saccharin, xylitol, sorbitol, sodium cyclamate to flavor the toothpaste.
- Buffering agents to make it a pH favorable for the oral environment.
- And, you may see silicas, dicalcium phosphate dihydrate or aluminum oxide which are abrasives which help remove plaque and bacteria as well.
 After years in the dental office, I can tell you that it’s very rare to find a patient who goes more than 3 years without a cavity.
Knowing that home care is one of the most important aspects of maintaining a healthy mouth, my partners and I set out on creating a home care regimen that’s relatively easy and will provide the results we are hoping to achieve, a decrease in cavities and improvement in overall oral health.
The final breakthrough of my home care routine recommendations came while reading Dr. Ellie Phillips book Kiss Your Dentist Goodbye. During our daily care routine, we are mainly focusing on removing and repairing the damage we’ve already done during the day. Removing plaque mostly and strengthening enamel. However, Dr. Ellie’s book brings up a great point, we aren’t focusing on improving the overall environment of the mouth, more specifically saliva makeup.
Combining both rationales, ours which focuses on mechanics and repair, and Dr. Ellie’s which focuses on reducing the saliva’s acidity and creating a healthier environment in the mouth, we created Frangella Dental’s basic home care regimen:
After years in the dental office, I can tell you that it’s very rare to find a patient who goes more than 3 years without a cavity.
Knowing that home care is one of the most important aspects of maintaining a healthy mouth, my partners and I set out on creating a home care regimen that’s relatively easy and will provide the results we are hoping to achieve, a decrease in cavities and improvement in overall oral health.
The final breakthrough of my home care routine recommendations came while reading Dr. Ellie Phillips book Kiss Your Dentist Goodbye. During our daily care routine, we are mainly focusing on removing and repairing the damage we’ve already done during the day. Removing plaque mostly and strengthening enamel. However, Dr. Ellie’s book brings up a great point, we aren’t focusing on improving the overall environment of the mouth, more specifically saliva makeup.
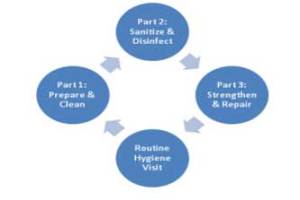
Combining both rationales, ours which focuses on mechanics and repair, and Dr. Ellie’s which focuses on reducing the saliva’s acidity and creating a healthier environment in the mouth, we created Frangella Dental’s basic home care regimen:
Part 1: Prepare & Clean
This portion of your home care focuses on the mechanical aspect of cleaning your mouth. The first step is to prepare the right oral environment. You can do this by using an oral rinse that creates a less acidic pH in your mouth. The product we recommend is CloSYS. We also recommend investing in a good electric tooth brush. Our favorite is the Sonicare tooth brush. Find floss that works best for you. I generally recommend unwaxed tape varieties of floss as opposed to the rope type. The brand I recommend the most is Glide.Part 2: Sanitize & Disinfect
Directly after brushing and flossing your teeth, the next step is to rinse with an antibacterial rinse. Our favorite product on the market is Listerine. After brushing your teeth, be sure to sanitize your tooth brush, you can do this by rinsing your brush in Listerine, then rinsing with water and allowing to air dry. Also, always store your toothbrush away from open toilets as well.Part 3: Strengthen & Repair
This portion of home care helps keep your enamel strong and healthy. At night, as the last step of your home care, you should rinse with a fluoride rinse. We recommend ACT Total Care fluoride rinse. After you have rinsed with the fluoride rinse, do not rinse with water. Also, throughout the day, to give added protection, you can chew xylitol gum or use other 100% xylitol products. You want to aim for about 6-10 grams a day of xylitol to get the best anticavity effects of this sugar substitute. To see all of Frangella Dental’s recommeded home care products, click here.]]>
- If you’re using a manual brush, it should always be a soft bristle toothbrush. I wouldn’t recommend buying a hard bristle one unless you’re planning to use it to clean the grout on your bathroom tiles! Hard bristles are too harsh for teeth and not necessary to do an effective cleaning job.
- The proper technique is to move the brush over the teeth in a circular motion. Never use a front to back “sawing” motion.
- A typical brushing routine should include brushing at least two to three times a day for two minutes, breaking up the time evenly amongst the different areas of the mouth.
- If you’re using a manual toothbrush, we recommend switching to an electric one. They often have two-minute timers built in with a beep to remind you to switch to the next part of your mouth and give a nice uniform amount of pressure. Electric toothbrushes do most of the work and help you resist the urge to scrub too hard.